Saturday, February 26, 2011

Greenhouse Gala meets Elegant lines

This card was inspired by a design on Splitcoast http://jentimko.stampincorner.com/2010/09/29/birthday-flowers/.  When I pulled out this DSP the other day to make the book mark card it seemed to hang out on my desk for a while longer.  The base is baja breeze and embossed with the elegant lines embossing folder from SU.  I added a small strip of pear pizzaz (trying to make my few sheets go as faaaaar as possible).  then I overlaid a scrap strip of choc chip stripe ribbon.  Yes I have a LOT of scraps.  I keep all my SU ribbon scraps in an old plastic jar.  It's amazing what you can do with an inch or two or three.  The flowers were "fussy cut" and popped up on dimensionals.  I added some chocolate pearls to the top and there you have it.
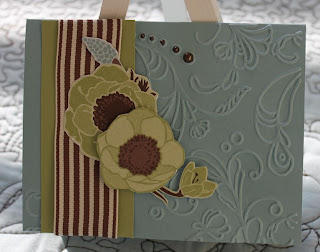
I think the only improvement would be to add some glimmer mist.  This is the perfect card for a birthday, thinking of you, get well or sympathy.  This one is a sympathy card for a co-worker from my days as an ortho nurse on the Gulf Coast.  Miss Anne will really be missed.

Friday, February 25, 2011

Friends are Flowers that never fade


Today I spoke with a "new friend" Dawn.  I've followed her blog for a long time and after talking on the phone with her she is exactly what I thought she would be...a sweetie!  Keeping with the girl scout song...."make new friends but keep the old...one is silver and the other gold".  Here is the latest project from my desk.  Last weekend we shopped at the mall and got a few freebies (w/ purchase) from Crabtree and Evelyn.  Of course I could just toss these at my friends and they would love them but why not dress them up a little. Start with a piece of CS 4 inches by 8 1/4.  Score at 2 3/4 then 2 3/4 from that score line.  Fold the third section in and make a mark 1 inch up from the bottom.  Draw a line from that point to the top right corner and cut that off.  Using scor tape or sticky strip along the bottom edge and the 1 inch edge.  Decorate the front as you like.  I've used the greenhouse gala DSP and used the friends never fade stamp embossed in white on pumpkin pie.  I put two pieces of sticky strip on the bottom and pleated a scrap of pumpkin pie ribbon.  I added 2 of the glimmer brads for interest.  I have been experimenting with off centered main images lately and really liking the results.  Come back tomorrow for another card!

Thursday, February 24, 2011

Welcome daughter

Another baby card...my goodness...romance was in the air about 10 months ago huh?  This card is for a co-worker of my husband.  Her shower is next week so I'll be making a diaper cake and a hat again.  I also want to try 2 other craft endeavors but I'll reserve letting you in on them until I can try them out.  This card came together pretty quickly because I followed my own advice...if you're going to make one card ...make two.  The last time I had this set out I stamped and made an extra boy and girl image.  The base is pretty in pink with a layer of certainly celery DSP.  Then the main image is on so saffron DSP and CS.  The side is embellished with PIP punched with scallop edge punch then some PIP stripe ribbon.  The pink rose is made from felt cut with the MFT rolled rose die.  The center always needs something and this time I rolled it fairly loose so the epoxy brad fit perfectly.  To add to the flower element I punched two "branches" from the bird punch.  I felt this sentiment went perfect with the flower embellishment.  Thanks for looking. Come back tomorrow for my first "tutorial".

Tuesday, February 15, 2011

two tags die bookmark card

I saw this idea on splitcoast stampers who linked to her blog. http://www.simpleandsincere.com/2010/11/tiny-tea-cup-bookmark-card.html.  This card uses the new in-color pear pizzaz.  Of the in-colors this is my favorite.  The bookmark is in baja breeze.  I used the basic grey magnets which are super strong and I find if I separate them with a layer of CS it is better.  I love using the stickles in the center of the flower.  Thanks for looking.

Friday, February 11, 2011

Inlaid embossing


I had seen this techinique on other blogs and got the square lattice embossing folder to try it out.  WOW! What a great technique that is simple and gives both texture and creates a unique background.  So far I've tried it with the boho blossoms and with the trio heart punch.  This card uses my newest goodies.  I know I will get great use out of the set Greeting Card Kids.  The medallion is made from the MFT dienamics 1/4 inch die.  Two pieces glued together.  The girl is colored with copics and the heart she is holding has glitter on it.  Inside I put a crocheted heart pin.  If you are into crochet and like the pattern (pretty easy- some treble crochet on an E needle) just send me a comment and I'll send you the link to the pattern.  This card is going to my folks.  I'll see if the card get's there first or my mom check's my blog :).  Thanks for looking.

Thursday, February 10, 2011

Pucker Up

All this week I've been leaving my hubby a small Valentine in a cute little mailbox I got at Target.  I've been using the 3 x 3 cards I made at an Archiver's class.  These have not been big gifts...a package of gum with the note you make me smile.  Today I gave him this can I got the idea from Splitcoast Stampers http://hlkdownstairsdesigns.blogspot.com/.  Soooo cute and quick and easy.  She filled hers with lemon heads but I put the yellow and red sourpatch kids in this one.  It uses the stap set Tart and Tangy.  I used the daffodil delight ink and some yellow and red ribbon I also picked up at Michael's along with the tin.   I used the full heart punch alsong with the smallest heart from the trio punch.  The big heart didn't seem to be standing out so I added some faux stitching with my white signo gel pen.
Now I'm off to make something for tomorrow.

Make someone's day

Today I took this treat to the post office.  I was also trying to mail a package but their machine didn't work.  I left the treats and the worker told me "you made my day".  How nice.  The original idea is from Inking Idaho's Becky Roberts.  I adore her work and her tutorials especially at Christmas.  It is two Hershey nuggets held together with a glue dot (can't live without those).  The CS wrapper is 1 1/4" by 4 1/2 ".  Don't adhere this directly to the nuggets.  Then you cut a piece of CS to slide under the nuggets (see previous direction) and trace the outline and cut.  Glue one end up to make the back of the mailbox and leave the other end open.  I used a small brad and the small heart from the heart trio punch for the " handle".  Then with a piece of DSP cut 1 inch by 4 1/2 inch wrap around the nuggets but don't adhere.  Mark on the DSP where you want your flag attached and punch a hole with your small paper punch.  The flag handle is 1/4 inch and the flag is 3/4 by 1/2 inch.  attach hearts to the flag, flag to the pole and pole to the DSP before gluing the DSP to the CS.  I hope this makes sense.  I will probably do these as my son's valentines in the future but it does take a little time to do (not a Sunday night at 7pm gotta have 30 of them by tomorrow).  Enjoy and go out there and make someone's day.  I'll be leaving one in our mailbox for the mailman Monday.

Monday, February 7, 2011

MFT challenge week #5

Numbering the weeks is going to make this year go quickly.  Here we are with another try at the My Favorite Things Wednesday Sketch challenge.  This one was a bit of a challenge for me.  I will always reach for a standard size 4 1/4 by 5 1/2 card when other sizes are so much fun as well.  My next favorite size is 3 x 3 but this sketch and image needed to be 5 x 5.  The base is choc. chip and the DSP is retired from SU in the colors kiwi kiss (miss you) and riding hood red.  The MFT set is snow boy and dog.  I LOVE this set and used it for my Christmas Cards this year.  His sweater, scarf and hat are paper pieced and the rest is copics.  His boots are with the black glaze pen.  The ribbon is SU riding hood red and is still on their clearance for 1.99 for 10 yards!  I also used a new product that I've been eyeing since I was in Japan (7 years ago)...liquid applique.  I know I should have discovered this sooner because I LOVE IT.  It is on his hat pom-pom.  The button has a flower but I think of snowflakes as winter flowers.  I figured so much of the country had snow I might as well pull this guy out again.  Thanks for looking,  Come back tomorrow as I hope to have some Valentine projects.

Friday, February 4, 2011

MDS playful

Yes...this is my child.  The greatest joy I've ever known.  The last MFT stamp set I got had the perfect description of a boy... "a noise with dirt on it".  Everyday as I turn the knob to go into his room I wonder what I will find.  There are times in motherhood when you can laugh or you can cry...pick laughter and grab your camera.  This page had two photos one from our home and one from Nana's.  I seriously hardly ever hear him getting into stuff.  It just happens.  I love that with My Digital Studio I am better able to journal closer to actual events.  It is a great place to try out layouts.  I also love that I can share pages digitally with friends and family.  Hope you enjoy this one!  I can't wait to see what tomorrow morning brings.

Another baby?

Well...this baby is of the furry and four-legged variety.  Our dear friends in Omaha just welcomed a new golden pointing lab.    I used my Paper Pups cricut cartridge.  This one is called huntin' dog.  So appropriate as this dog will go out in the field for pheasant.  I used not quite navy for the background and embossed for a "manly" texture.  The paper is from SU pack called walk in the woods.  The dog is cut from creamy caramel (retired) and edges sponged with chocolate chip.  The newest pup is an Army brat and his name is Caisson.  He joins brothers Tank and Gunner.  Welcome Baby!